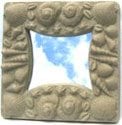
Brighten up your home and garden with Gardenmold’s new line of picture frame molds. They’re simple to use and very versatile. Either plaster or concrete can be poured into the molds (plaster, however, should not be exposed to rain or snow). You can glue mirrors to the frames, or leave the frames empty. Or glue a collage of shells, dried flowers, etc. to a board and affix to the picture frame. Here are basic instructions for making the frame and mounting a mirror:
For this project you’ll need
- Smooth (pebble-free) cement mix. “Sand Mix” can be purchased at most home improvement centers; this is a 3:1 blend of sand and Portland cement. Other options: small 6# cartons of concrete patch mix, or sanded grout which can be found at tile and marble supply stores and large home improvement centers. Sanded grout comes in a variety of colors.
- Vegetable oil as a mold release.
- Wire (if plaque is to be hung); pliers for bending wire.
- Mirror. Most picture frame shops offer cut-to-order mirror for just a few dollars. Make sure the mirror is cut at least a couple inches larger than the picture frame cavity. For instance, if the picture frame has an inner diameter (I.D.) of 5”x 5”, order a 7”x 7” mirror. This ensures an adequate gluing surface for all four sides.
- 100% silicone adhesive caulk, preferably clear. Found in any hardware store.
- Iron oxide colorant (optional).
Procedure
Brush the inside of the mold with a thin layer of vegetable oil- this acts as a mold release. Slowly pour water into the cement mix and stir, adding water until the mix resembles brownie batter or a thick pancake mix. Any colorants (optional) can be added now and stirred well to ensure thorough blending.
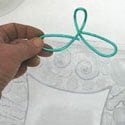
If the plaque or mirror is intended for hanging, the next step is to bend the wire. This is best done before pouring the concrete to ensure a proper fit with the mold. Using a 6-8” length of wire, bend a loop in the middle (see photo). This loop is then bent upwards at a 90-degree angle. Make sure the two ends of the wire fit into the mold cavity.
Pour a small amount of the mix into the mold, just enough to cover the design surface. Now lightly tap the mold on the tabletop. This will help dislodge the air bubbles trapped in between the surface of the mold and the wet concrete. Since the molds are clear, you can gently tip the mold (the cement mix should be thick enough to more or less remain in place) and actually see where air bubbles are lodged. Continue tapping until these disappear. Stubborn air bubbles can be punctured with the tip of a pencil or bamboo skewer.
After the air bubbles have disappeared, pour the remainder of the mix into the mold and tap to level. Please note: the gargoyle plaque and the shells picture frame have an uneven surface profile, and will therefore not lie flat on a tabletop. This is easy to fix. Simply fill a small box with sand or potting soil and then press the mold into the sand or soil until level.
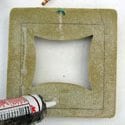
Place the wire hanger in the wet concrete, making sure that the loop is centered left to right. If mirror is going to be glued to the frame, situate the loop so that there’s enough room for the mirror.
Cover the concrete with a sheet of plastic wrap and cure for 48-72 hours in a cool location. Then gently de-mold. Let the concrete cure another 4 to 5 days before hanging; concrete is “green” for about a week and can break without proper curing.
To glue mirror to a frame, center the mirror on the back of the frame and mark this location with pencil lines. Remove mirror and then apply an even bead of silicone adhesive all along the inside of the pencil marks. Set the mirror in place and gently press until the mirror lies flat against the picture frame. Allow the adhesive to harden for 2-3 hours.
If you want to dress up your picture frame, check out Decorative Finishes in our Tutorials.