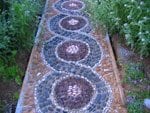
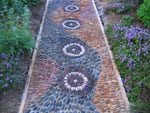
Last summer I tried my hand at pebble mosaics (see Making Pebble Mosaic Stepping Stones in the Tutorials). I designed a total of 12 round stepping stones: three paths, three designs, four stones each path. These 9′ paths lead from sidewalk to street. Here in Portland, Oregon, gardeners often remove the grass in the strips and replace them with flower, vegetable or perennial beds. The front and side strips of my home (a corner lot) are part xeriscape, part vegetable garden and part orchard (fig, pear, plum and cherry trees). Last summer I was completely in love with my new paths and pebble stepping stones. Then followed the winter of my discontent. I’m constantly, vexingly setting higher bars for my garden, with both plants and hardscaping alike. There’s little rest around here!
My new dream was to have three complete pebble mosaic pathways, not just individual stepping stones. This spring, out went the stepping stones and in went the pathways, though I did incorporate these stepping stones into the pathway designs. Read on for the method to my madness.
For this project you’ll need:
• Wheelbarrow
• Hoe or shovel
• Garden hose and spray nozzle
• Mortar mix, 60# or 80# bags
• Crushed gravel
For straight paths:
• 2×6 lumber and stakes.
For curved paths:
• Plastic lawn edging or bender board and stakes
• Pebbles
• Whisk broom and wire brush
• Dust mask
• Rubber gloves
• Muriatic acid and rags (optional)
Step One: Gathering Pebbles
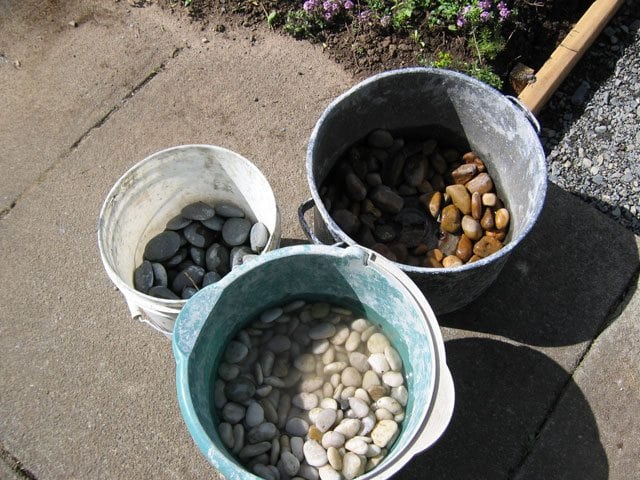
Approximately 125-150 pounds of pebbles were needed for one 3’x9′ path. The orange and blacks were gathered during several dog-walking trips to the local river (Daisy played in the waves while I obsessed on the shore); the other rocks were purchased in 50# bags labeled “Mexican river rock.” These bags held quite an array of colors; wetting the stone helped with color sorting. I sorted into separate containers by color only; sorting can also be done by size and shape. It all depends upon your design and how much trouble you care to make for yourself!
Step Two: Designing and Path-Prepping
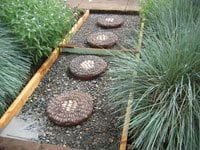
To continue: with the help of Richard, my friendly neighborhood handyman, I next excavated path trenches. Digging 5 ½” down below the intended finished path level, we staked and leveled the 2×6’s along both sides of the trench. Since 2×6’s are actually 5 ½ inches wide, the tops of the boards created the perfect level template for the pouring of mortar and setting of stones.
Approximately 2-2 ½” of crushed rock was then shoveled into the bottom of each trench. The three paths consumed one cubic yard of rock which we stamped firmly into place with our feet.
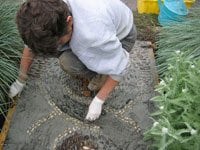
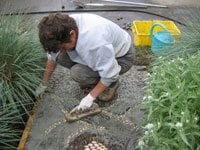
Step Three: Mixing Mortar, Embedding Stones
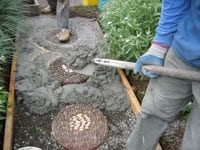
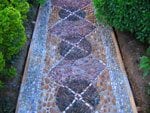
To level the pebbles as the path grew, we laid a 2×12” board across the path. We lightly stomped on this until all the stones beneath the board were level with the tops of the 2x6s. I became a little disenchanted with this method because it affects such a large area of stones and displaced some stones in ways I wasn’t happy with. I switched to using a wooden finishing float and evened the rocks as I went. This method probably doesn’t level the stones as uniformly as does the board-stomping method, but I figured as long as the path didn’t have any sudden rises or dips, there’d be no tripping hazard. The finished paths do have some subtle undulations , but that’s part of their charm.
Step Four: Finishing Touches
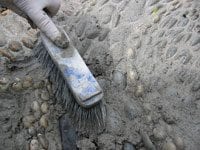
Each morning after a new path had firmed overnight, I was up early hosing the stones then lightly scrubbing away any gobs or thick coatings of mortar mix with a wire brush. The mortar is still a little soft at this point so you want to go easy. After this cursory cleaning, I left the paths alone. Too much cleaning can pull away too much mortar.
A week or so later, the final cleaning was done with muriatic acid. A thin white film of Portland cement was still coating the stones. Muriatic acid can be purchased in any hardware store, but be sure to follow safety instructions when using this stuff. You’ll need gloves, goggles, a respirator and skin protection. I “sealed” my face with Vaseline jelly. The stones are cleaned by rubbing with muriatic-dipped rags. After cleaning, spray the path with water – this neutralizes the acid. The stones will really shine now. The boards can also be removed with a hammer and large cold chisel or the tip of a shovel.
This project created quite a stir in the neighborhood. Some of the neighboring kids came and helped insert stones, the adults provided plenty of questions, comments, oohs and aahs, some even vowed to make their own paths. I’m constantly admiring the paths, as well as enjoying the reactions of passersby as they discover these magic carpets.