Materials:
• Sand: fine or coarse
• Portland cement: white or grey
• Iron oxide colorant: one or two colors (Grey concrete can be used as one contrasting color)
• Cement fortifier, found in most hardware stores or home improvement centers
• Leaves—relatively flat, strongly veined
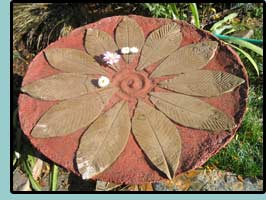
Finished birdbath with floating flowers
Tools:
• Utility tub or mixing bucket
• Thin latex gloves
• Dust mask
• Hand trowel
• File or heavy grit sandpaper (optional)
Preparation
If you wish to duplicate my basic design, choose relatively flat, uniformly sized leaves with strong vein structure. Keep in mind that the length and width of the leaves will somewhat determine the diameter and shape of the bowl or birdbath, so choose leaves accordingly. If you want a small vessel, select small leaves…large vessel, large leaves. Also make sure to gather and cast extra leaves as a backup for the project.
Ready, Set, Go!
Lay the leaves on a worktable, bottom side up. Place a dollop of concrete in the center of each leaf and pat the mixture outward towards the edges of the leaf. This patting helps release air bubbles which otherwise become trapped between the leaf and the concrete. (Air bubbles become pockmarks in the finished concrete.) The concrete should be approximately ¼” thick. Allow the concrete to harden; 48 hours should be sufficient.
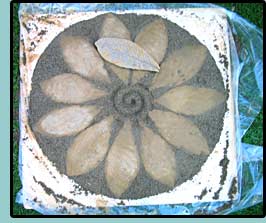
Concrete leaves embedded vein side down in sand. Note individual leaf on top – I used leaves from the buckeye tree for this project.
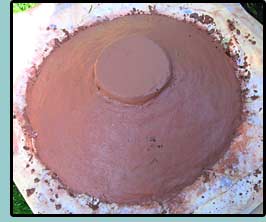
Now wet several quarts of sand with tap water (the amount of sand will depend upon the size of your project) until the sand is thoroughly moist but not soggy. This sand will form the “base” upon which the concrete leaves are laid. For a deep bowl, pack the sand into a steep hill several inches high. For a shallow birdbath, form a sand mound that’s two to three inches deep at the center and gently levels out toward the edges. Some minor adjustments in the size and shape of the mound may be needed so that the leaves fit properly into your design.
A Quick Aside Here Concerning Some Design Possibilities:
Think of the sand itself as an integral part of your design, a moldable canvas. First off, it has texture. The sand’s texture will imprint into the second pouring of concrete. Choose a grit which conforms with the “finish” you want for the leaves’ background. Fine sand will create a soft, matte finish whereas coarse sand will lend more visual contrast, creating an earthy, rough-hewn look. Mix small pebbles into the sand for even more texture.
Wet sand can also be sculpted. As you see in the birdbath photo, a spiral design sits at the center. The spiral was first sculpted into the sand and then wet concrete was gently and thoroughly tamped down into the design. If the sand crumbles as you sculpt, moisten with a spray bottle.
Moving On:
Before pouring the next batch of concrete, there’s one design decision to make. Do you want a completely smooth interior surface to your bowl or birdbath, or do you want the leaves to stand out as relief? For a smooth interior surface, the leaves should remain “freestanding” on the sand. For an interior surface with raised leaves, tamp extra wet sand around all the leaves until the sand and the backs of the leaves form one smooth, even surface. (Upon demolding, this extra sand will be brushed away, raising the leaves about ¼” above the background. For even more pronounced relief, make your leaves ½” thick instead of ¼” thick when first casting them.) Brush off any excess sand from the leaves so that the second pour of concrete has a clean surface to adhere to.
Entire sand and leaf mound covered with 2nd concrete casting. You can also build a “foot” on top to stabilize the bowl or birdbath.
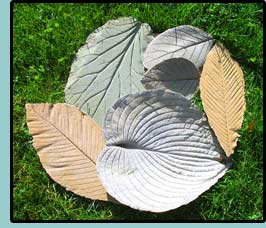
As mentioned earlier, use my birdbath as a starting point. All kinds of design possibilities exist: bordering leaves with marbles, stones or mosaics; making an assortment of different sizes, shapes and colors of leaves to create a leaf mosaic; sculpting sand to create fluted edges, paw or hand prints; embedding coils of clay to fashion more elaborate designs not possible in sand. And the shapes don’t even have to be vessels- what about flat wall hangings? Or picture frames using cast leaves as the border? Stay tuned!
If you’ve never made leaf casts before, you can skip the two-toned bowl and make plain leaves using the principals outlined in this article.