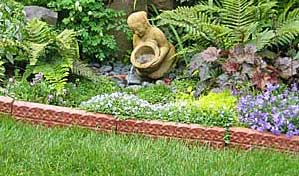
Making Variable Length Border Trims
Edging Stone molds produce stones of approximately 14-15″ in length. But what if a 9″ stone is needed to finish the project? Here are two simple solutions.
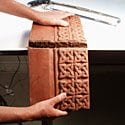
• Shorter stones can also be made using oiled cardboard. Cut a piece of cardboard the approximate width and depth of the border mold, 8″ x 2″. Oil the cardboard on both sides. Pour concrete into the mold, then insert the cardboard into the mold at the desired length. Don’t worry about getting a perfect fit; if the hardened segments are slightly joined, they’ll separate easily with a little pressure.
Creating Flat Border Trims
Cut a 15″ x 2″ strip of cardboard, brush both sides with oil, then place lengthwise down the center of the filled mold. After demolding, save the plain half. For subsequent pours, oil this “plug” then insert in mold; 50% less concrete will be needed to fill the mold.
