Materials:
• Sorted pebbles.
• Thinset (found in home improvement or masonry supply stores)
• Sanded Grout (for ¼”- ½” tiling): comes in many colors. (found in home improvement or masonry supply stores)
• Plain round or square stepstones.
• Muriatic acid (optional).
Tools:
• 1-2 gallon pail or utility tub for mixing Thinset.
• Small bucket filled with clean water.
• Stirring stick or electric drill with mixing rod.
• Dust mask.
• Rubber gloves.
• Nylon-bristled utility brush.
• Sponge.
Preparation
If you live near a river or sea and have easy access to rounded pebbles, gather them yourself; it’s dreamy and relaxing. Ideal pebbles for stepping stones are 1” to 1 ½” diameter. If you want color contrast in the design, sort the pebbles by color as well as size. No pebbles in your neighborhood? Decorative rock businesses sell sized-sorted rock in 50 pound bags; several colors are usually available. A 16” stepstone will require approximately 15 pounds of 1 to 1 ½” diameter stones. Whether you gather or buy stones, make sure they are clean before beginning the project.

For the base on which to glue the pebbles, you can either make these yourself using GardenMolds’ plain round and plain square molds, or buy pre-made concrete stones purchased in home improvement or garden stores. Note: our molds produce a 16-inch wide stepstone; most pre-made stones are 12 inches.
The choice of work area is up to you, but weather permitting, I like to sit outdoors in a chair or stool. I place the plain stone on a slightly lower surface; a milk crate or 5-gallon pail is suitable. The stone sits between my outspread legs, much like a potter at the pottery wheel. This gives me a lot more control, both visually and physically. Don’t forget to spread some newspaper under your working area to catch any dripping Thinset or grout.
Design Considerations
A word to the wise on design: keep it simple! A 12 or 16 inch surface is not much area to work with, and complicated design and color combinations will not translate well. A lot can be done with only two colors; just make sure the colors you choose have enough contrast. Black and white is the most obvious choice. In addition to colored pebbles, don’t forget that you’ll be using grout in this project. Grout comes in a wide variety of beautiful colors so consider these colors part of your palette.
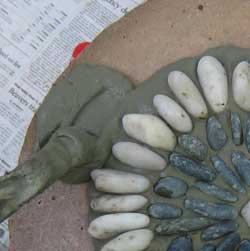
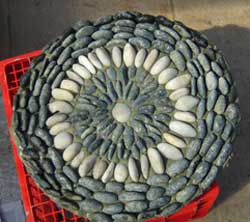
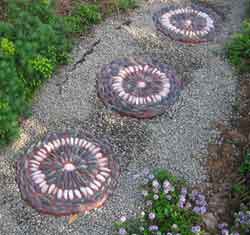
Aside from variation in color, much visual interest can be created by simply changing the direction the pebbles are placed in relation to one another. See photos for ideas.
Ready, Set, Go!
Work area organized, pebbles clean, plain stepstone ready? Then it’s time to mix Thinset. For a 16” stepstone, you’ll need approximately 1 ½-2 dry quarts Thinset mixed with enough water to create a stiff brownie-mix consistency. Gloves and dusk mask are recommended when working with the dry powder. Thinset is an acrylic-based adhesive prone to lumpiness. Hand-stir until most of these lumps are gone (you don’t have to go overboard though- a few small lumps don’t seem to compromise the mix). If you insist upon a perfectly smooth batter, all hardware stores carry mixing rods fitted for electric drills; the results will please the obsessive-compulsive amongst you. A stiff consistency to the mixture helps keep the pebbles standing in place; thinner mixes allow the pebbles to slump.
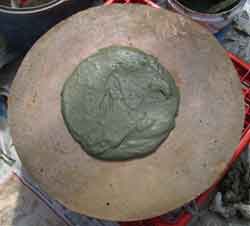
You’ve probably drawn out a design for the mosaic by this stage. To “sketch” a rough outline of your design onto the stepstone base, spread a thin icing of Thinset onto the stone and draw the design in the wet mud. Fair warning! No matter how detailed and geometric your drawing is, stones have their own life and logic. Which is part of the beauty of this work, the unintended often being more interesting than the intended. A little asymmetry adds life to design.
I like to start at the center of the stone and work out. Begin with a 6” diameter puddle of Thinset, ½”-3/4” thick. Place the stones on edge, not lying flat. One-half to two-thirds of the pebble’s height should be submerged in Thinset. Keep in mind that there will be some size variation in your stones (unless you are one of the aforementioned obsessive-compulsives and have sorted everything to perfection). It’s best to set the slightly taller stones at the center, using shorter and shorter stones as you work out toward the edges. This keeps rainwater from pooling in the middle of the finished stepstone as well as “softens” the edges of the stone, making it less likely to be tripped on.
As you work, keep the pebbles packed as closely together as possible. This makes for a much stronger concrete bond and less likelihood of pebbles becoming dislodged. Fitting the stones together can be like fitting puzzle pieces-some fit, some don’t. This is where a bucket of clean water comes in handy. The misfits will most likely be covered with Thinset, so toss these into the water to soak and clean. I often end up fishing them out to be used in another section of the design. And try to keep your stones as Thinset-free on their topsides as possible; this saves on cleanup-time after the Thinset hardens.
Even with a stiff mix of Thinset, the first pebbles may slump a bit. As pebbles are added, they’ll have neighbors to lean on. If you have to re-set some of these slackers, always press stones inwards towards the center of the stepstone. Otherwise pebbles set on the edge of the stone tend to slump off into the void.
After the center is set with pebbles, spread a 3”-4” ring of Thinset around the center and continue working. Some Thinset from the center may have oozed outward as it was displaced by the pebbles, so add just enough extra adhesive to keep the pebbles one-half to two-thirds submerged. If some pebbles aren’t seated in enough Thinset, frost their bottoms with a little extra batter, much as you would a cookie. As the design progresses, occasionally rotate the stone or stand up to take a bird’s eye view. It’s hard to notice design deviations otherwise. And don’t feel rushed with this work. Thinset takes leisurely hours to firm, even on warm summer days.
After finishing with that ring of pebbles, coat the rest of the stepstone base with Thinset and finish up the design. As mentioned earlier, some of the outer stones may want to slump over the edge, so push these center-wards.
All stones now securely in place and you’re happy with the design? Time then to let the Thinset cure. Place the stepstones in a cool, dry location- this is a curing process, not a cooking process. Depending upon temperature, the Thinset may take from one to three days to harden. To test for cure, wiggle some pebbles. If they jiggle even slightly, the Thinset hasn’t cured. Be patient.
Grouting
Before grouting, moisten the set pebbles then bristle-brush off excess Thinset still adhering to their tops.
There are a couple types of grout available; purchase the sanded grout formulated for filling ¼”-1/2” grout lines; this will be printed plainly on the bag. A rainbow of warm earthy grout colors are available. As mentioned earlier, you can use these colors as part of your design palette.
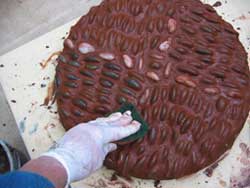
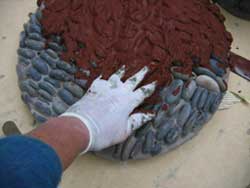
Mix according to specs, using gloves and a dust mask. Aim for a loose brownie-batter consistency. Now spread grout over the top of the pebbles. You can use a sponge for this task; I prefer gloved hands. Squeeze the grout into the spaces between the pebbles; no voids or air pockets should remain. After all the gaps are filled, try to remove any excess grout because the stones should not be completely covered. Aim for about ¼” – 1/2” exposure of the rock tops. The sloppy consistency of the wet grout makes this task a little problematic, but don’t worry. After the grout has set a bit the cleanup is easy.
Let the grout cure until it begins to firm up. Again, don’t set in a hot, sunny location- this is a curing and not a cooking process. During warm summer months, it will take less than an hour to start firming. But not too firm, or you won’t be able to easily brush excess grout off. For this timing, I watch the color and texture of the grout in between the pebbles. At first it’s dark and wet, but as curing commences the color lightens and the grout becomes somewhat firm but still pliable. Think of the consistency of firm, wet sand.
With a nylon brush, gently brush off excess grout. You can use the edge of the brush to cut into the grout between pebbles, exposing a little more of their surface. As mentioned earlier, ¼” to ½” top exposure looks nice but there’s still plenty of grout to hold the pebbles in place. After you’ve sculpted the stone to your liking, gently hose off the stone. Set the stepstone in a cool location for the next day or two. If the days are particularly warm, it won’t hurt to moisten the stones a couple times during the day. This makes for a more even cure; too quick a cure can produce cracking in the grout.
After curing, the grout should be completely firm. You can now scrub the stepstones with soapy water. After cleaning, a slight haze of grout may still remain on the stones that soap and water won’t remove. If this doesn’t bother you, the stones are ready to be set in place. But if you’d like a little higher “polish” to the mosaic, scrub the stepstone with a solution of water and muriatic acid, which can be found in any hardware store. Since it is an acid, please follow label directions for proper care and handling. When using muriatic, I work in the driveway to avoid getting any solution on plants.
NOTE: Don’t hang your face directly over the stone as you work because a slight vapor is creating when the acid reacts with the grout. After a half of minute of scrubbing, rinse with water. The muriatic is neutralized with the addition of this extra water and your stepstones will really shine.
Setting Stones In Place
The stones are now ready for placement. To set in an existing lawn, place the steppingstone where desired. Using a sharp knife, cut around the perimeter of the stone and into the sod. Pull up the sod and dig down to an appropriate depth- this will depend upon how deeply you want to inlay the stone. Then place the stone in the hole and test for levelness or wobble. Any wobbliness can be corrected by removing the stone and sifting some sand or loose soil in the hole to build a more level foundation.
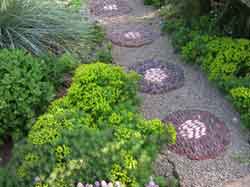
For my path, I chose to lay pebbles around the stones to create a more dramatic break between the path and the visually busy garden. I first dug a shallow trench in the ground, 2 or 3 inches deep and approximately 3 feet wide. After leveling the soil, I cut up an old tarpaulin and laid strips in the pathway (thick plastic drop sheets also work well). This is my chemical-free solution to weed control. After setting the stones, gravel was shoveled into the path.
Even as a child I never understood the division between the “living” and “nonliving” worlds. For stones surely do possess life and personality. If not, what explains their powerful spell? The pebbled steppingstones which grace my garden between sidewalk and street have become irresistible magnets for passersby, both young and old.