Basic Instructions
COST: approximately $1.00 per stepping stone, 40 cents per Edging Stone stone
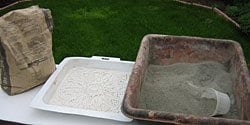
MATERIALS:
• Wheelbarrow or all-purpose plastic utility tub.
• 60# bag of either pre-mix concrete or mortar mix.
• Shovel or small garden spade.
• Rubber or latex gloves.
• Dust mask, particularly if working indoors without ventilation.
• Plastic sheeting.
• Mold release. Liquid vegetable oil such as canola and safflower.

Concrete Mold and Plaque Pouring
pigments to turn gray into shades of red, buff, brown and green.
IMPORTANT NOTES:
• One 60# bag of concrete yields approx. 3 Stepping Stones or 7-10 Edging Stone stones.
• Do not use PAM or other sprays as a mold release; they don’t cover evenly or thick enough.
Making Your Own Concrete Garden Stepping Stones
First brush inner mold surface with mold release, applying with an inexpensive paintbrush. Remove excess oil with a paper towel or dry paintbrush. Next, measure out dry concrete or mortar mix in a wheelbarrow or utility tub. For square stepping stone molds, use approximately 7 1/2 quarts of dry concrete (before the addition of water); for round molds, 6 quarts dry. Edging Stone molds will require approximately 3 quarts dry concrete or mortar mix.
If using iron oxide pigments, add now. Generally, 3-4 tablespoons pigment per step stone and 1 1/2 tablespoons per Edging Stone stone will produce a pleasing saturation. The colors will appear muted while the concrete is still wet, so resist adding extra pigment. Take notes on how much is used so that the color can be duplicated or tweaked in future pours.
STEP 2.
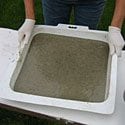
Fill mold with 1/4″ to 1/2″ of concrete, just enough to cover the design surface. To remove air bubbles from the concrete (which otherwise form pockmarks on the finished surface), lift one side of the mold ¼”-½” and tap lightly up and down on the worktable for a minute or so. Turn the mold 90 degrees and repeat, until all four sides have been lifted and tapped down. Think of this motion as a gentle vibration. Then fill the mold, tapping a few times to level concrete.
STEP 3.
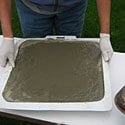
Cover filled mold with plastic sheeting and allow concrete to harden in a cool (and level!) location for two days before removing from mold. After demolding, cure stone another week before setting in ground.
return to top
NOTE: Moderate temperatures in the 50’s and 60’s (degrees F) are ideal for curing concrete. During periods of extreme heat or
cold, cure stones in a basement or insulated garage.
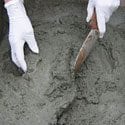
Mix concrete to muffin or brownie batter consistency
Partially fill mold and tap
to remove air bubbless
Fill concrete to top and
tap to level concrete
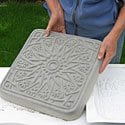
Allow to harden, remove
from mold after two days
Placing Stepping Stones
• First pace out the intended path, marking each footfall with a pebble.
• Center a finished stone on the marked spot then sprinkle flour along the stone’s outside perimeter. Remove stone.
• Dig down approximately 3-4″ within the confines of the flour border, roughly leveling the bottom of the hole.
• Pour 1-2″ of sand into hole. Level sand.
• Place the stepping stone. Jiggle back and forth until stone sits firmly and evenly in place. To set a stone higher or lower, simply add or subtract sand.
Concrete In Cold Climates
Concrete sealants:
Found in hardware and home improvement centers. They permeate the pores in concrete, helping form a water barrier. There are many sealants available on the market. Acrylic sealants are UV stable, inexpensive and easy to apply but have the softest, least durable finish. Solvent-based acrylic sealants generally perform better than water-based products for outdoor use, are UV-stable, and are recommended for applications where a flat finish is desired. Water-based epoxy bonds well to concrete, is harder than acrylic sealants, but isn’t UV-stable. For stones containing iron oxide pigments, UV sealants will help maintain color.
Allow the stone to cure 10 days to 2 weeks before applying sealants. Concrete which has been completely painted with either concrete paint or patio paint need not be sealed.
Wire or nails:
Wire mesh (such as chicken wire) greatly improves concrete strength. Cut a sheet slightly smaller than the mold’s diameter, lay flat into mold half-filled with concrete, then fill mold to top. Another easy reinforcement is a couple handfuls of galvanized nails sprinkled into wet concrete as mold is being filled; think of these as miniature rebar.
WELDBOND Universal Adhesive:
Weldbond brand can be found in hardware and home improvement centers. Mix 1 part Weldbond to 5 parts water; this will be approximately 4-5 ounces of Weldbond per stepping stone. Weldbond dramatically increases the strength of the concrete (up to 1700%).
Care Of Your Mold
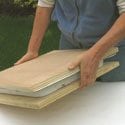
• Do not lift filled molds while the concrete is still wet. Although the mold’s rim can hold weight, repeated lifting will weaken the plastic. To move a filled mold, slide plywood underneath for easier transport.
• Store molds in a cool, dry place, away from heat and light. Heat makes all plastic brittle.
• Create a plywood “sandwich.” This technique will ensure the longest mold life possible by eliminating all stress on the plastic. To make a “sandwich”, simply cut two 18″ x 18″ pieces of plywood (1/2″ thickness is sufficient). Before filling mold with concrete, place one sheet of plywood underneath mold. When shaking out air bubbles, lift the edge of the wood (instead of mold lip) to vibrate the concrete. After curing, de-mold the stone by sandwiching mold between two sheets of plywood and flipping over.