Dyeing Concrete
The simplest decorative use of powdered oxide is to incorporate it into the still-wet concrete, adding powder until you’re satisfied with the strength of the color.
Or sprinkle small quantities of dry pigment (a little goes a long way) on the bottom of the mold before the cement is poured in; this yields a pretty mottling in the finished stone. Try using two or even three complimentary colors. Another interesting technique is marbelizing. Mix up a batch of concrete, remove a portion of the batch and add dye. Now loosely combine both batches, stirring just enough to create swirls of distinct colors. Pour into the mold.
Concrete Paints
After demolding your stone, allow it to cure for 10 days or so before painting. The surface must be scrubbed with a mild soap solution or vinegar, then allowed to dry before the application of paint. Stones which have been completely covered with concrete paint will need no sealants.
Concrete paints can also be found in 2-ounce bottles at most large craft outlets; here however, they go by the name of Patio Paints. If your project isn’t large, Patio Paints are the way to go. Several colors are also available for purchase on our website.
Washes and Overlays
There are two simple techniques to beautifully accentuate the design surface of the stones. Each takes just a few minutes of time.
Washes
A wash is an accent color which lays in the recesses of the design surface. Washes can be made using either iron oxide powder mixed with Portland cement, or with concrete paints; these two different mediums will produce two different finished looks. The procedures for creating both washes are as follows:
• Portland Cement/Iron Oxide Wash:
Combine approximately 1 cup Portland cement with 2 tablespoons iron oxide pigment. Add enough water to create a “slurry” the consistency of loose pancake batter.
• Concrete Paint Wash:
You probably won’t need large quantities of paint for your washes, so use Patio Paints, found on our website or at most large craft outlets. To make a paint wash, squeeze a couple tablespoonfuls of paint into a plastic container and mix with enough water to create a smooth-flowing emulsion.
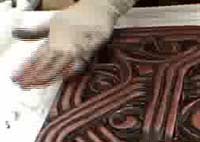
To apply a wash, brush the color over the entire surface of the stone, especially into all the nooks and crannies of the design. Have on-hand a few rags and a gallon pail filled with warm water. After the wash has been applied, wipe only the top surface with the moistened towel. Rinse the towel between swipes. After a few passes, the surface should be clean; the accent color will be pooled beautifully in the background.
As mentioned earlier, iron oxide washes give the stone a different finish than washes made from Patio Paint. Because iron oxide washes have “body” due to the Portland cement, the finished look is less defined, more rustic. Washes made from the thinner paint solutions lend more crispness and detail to the stone’s texture.
Portland cement/iron oxide washes should be applied to the stone immediately following demolding while the stone is still “green” and relatively uncured. This lack of cure will allow better chemical bonding between the wash and the stone. After 10 days or so, apply a sealant. Paint washes, however, should be applied after the stone has cured for about 10 days. Allow the paint to dry for 24 hours then apply a sealant.
Brush color over entire surface of stone
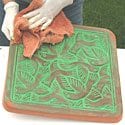
Wipe only the surface with a moistened towel
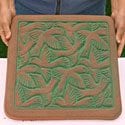
The accent color is pooled in the background
Overlays
An overlay is the opposite of a wash. Overlays are applied to the top design surface of the stone only; the recesses of the design remain free of added color.
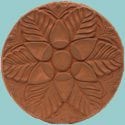
Overlays are very simple to apply. Don a pair of latex gloves and squirt out a teaspoon of patio paint (undiluted) into the palm of your hand. Rub this paint between your hands until you form a thin, even film. With the palm of your hand held flat, lightly swipe across the surface of the design. Color will begin building up on the high points. You can add as little or as much color as you like, or add second and third colors for more accent.
For stepping stones subject to heavy foot traffic, patio paint will hold up much better than iron oxide as an overlay.
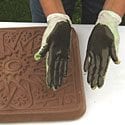
Create a thin layer of paint evenly across latex gloves
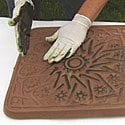
Lightly swipe across the surface of the design
Color builds up on high points
Mossy Finish
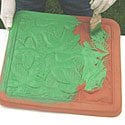
One other interesting finish for your stepping stones is a moss or lichen-covered surface. It takes a long time for moss to establish by itself, but you can hasten the process considerably. Here’s how:
• Gather a few handfuls of moss or lichen, cleaning out any rock or debris.
• In a blender combine 2 cups of buttermilk or yogurt with the moss; puree until the mixture is smooth and homogenous. 3 or 4 ounces of potter’s clay (found in any arts or crafts supply store) can be added optionally. This thickens the mixture, and helps retain moisture after the slurry is spread on the stone.
Another interesting growing medium includes fish fertilizer. Use the above formulation, adding 1/4 cup fish emulsion to the blend.
• Premoisten the stepping stones with a mister or garden hose, then apply the mossy slurry with a paint brush. Keep the rocks in a shady location, spraying daily to maintain consistent dampness.