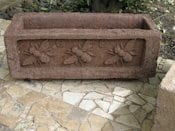
The Internet abounds with instructions for making simple hypertufa pots formed in milk cartons, cottage cheese containers, etc. You’re plumb out of luck if you want plans for something more artistic. But now, using one or two of our edging molds, you can create eye-catching planters that pop in your garden. These unique planters also make fabulous birthday and holiday presents and are great fundraising items as well. Here’s how to make them:
Materials:
• 1-2 GardenMold edging molds
• Portland Cement
• Sand
• Peat Moss
• Plywood, minimum 1/2″ thickness
• Screws
• 4 L-brackets
• 1 tube of silicone caulk
Optional: Iron Oxide Pigment
Tools:
• Band Saw, Jigsaw, or heavy-duty cutting shears
• Drill
• Philips Screwdriver
• Handsaw or Skilsaw
• Dust Mask
• Rubber Gloves
• Wheelbarrow or Utility Tub
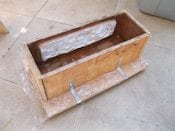
Building the Mold
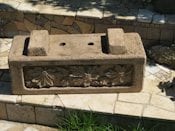
The finished planter pictured above was built from 5/8th inch plywood using the following dimensions: base-20”x 12”, two sides-18” x 6”, two ends- 7 1/2” x 6.” The size of the planter, though, is up to you (just keep in mind you have to lift the danged thing!).
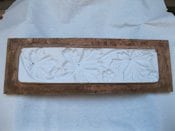
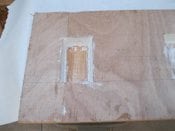
For design on both sides of the planter you’ll need two edging molds. Cut or saw the design surface off the edging mold using a band saw, jigsaw or heavy-duty shears. A side note on edging design: all of our edging designs work well for making planters, but some designs are busier than others. Because hypertufa is filled with peat moss, the finished design isn’t as crisp as it would appear if cast using plain concrete. If you wish to take a busy design and simplify it, simply fill in some of the smaller design elements with caulk, most of the flowers were removed so that the bees stand alone.
Before attaching, lay the plastic strip on the wood and see/feel the points where the plastic touches the wood. Pre-drill 3 or 4 holes at these points and then screw the plastic to the wood.
Now caulk the plastic strip around its edges. This will prevent hypertufa from wedging underneath the plastic, as well as helping stabilize the plastic. Squeeze out a line of caulk approximately one inch wide, making sure the gap between the wooden base and edge of the plastic is completely filled. After the caulk is laid, smooth the surface with a knife blade and create a slope or “draft” that’s wider at the base, narrower at the top. Draft is one of the most important principals in mold design; if there’s no draft, the design won’t release well. If there’s negative draft (an undercut), some of the hypertufa will get stuck in the mold.
Allow the caulk to completely harden then assemble the mold. Pre-drill the screw holes to make for easier disassembly after the hypertufa has hardened. Small L-brackets are the best way to join the mold sides to the base.
Before packing hypertufa into the mold, brush the sides of the mold with a thin coating of vegetable oil. Brush the bottom with vegetable oil then cut a sheet of plastic film to fit. This makes for much easier demolding.
Mixing Hypertufa
There are a few basic hypertufa recipes, some with vermiculite or perlite, some without. I chose a recipe without these additives because if you want to soften the edges of the finished planter after demolding, perlite and vermiculite show up as unattractive white spots when the edges are filed or sanded. To create a planter using the frame dimensions listed above measure:
• 4 quarts Portland cement, white or grey
• 2 3/4 quarts sand
• 5 1/4 quarts peat moss
• Approximately 2 quarts water
Optional: iron oxide pigment
Using a dust mask and rubber gloves, mix the dry ingredients well (a small shovel helps) then gradually add water until the mix resembles a crumbly cookie dough. When squeezed in the hand it should form a firm ball that easily falls apart when poked with a finger. An evenly moist “batter” is important, but not so moist that water readily drips from the mix when squeezed. If you wish to add colorant, now’s the time to stir in iron oxide pigment. The amount of color is subjective but start with approximately 1/4-1/2 cup.
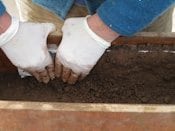
Scoop a few cups of hypertufa mix into the mold and begin pressing firmly into the bottom of the mold. Stress is on the word firmly. You don’t want air pockets or areas of uncompressed mix; this will weaken the container and lead to easy breakage. For the size planter shown here, one-inch thick bottom and sides are sufficient.
After forming the bottom, begin pressing the hypertufa into the sides of the molds. Add thin layers incrementally, pressing the mix firmly after each addition to make sure the walls are uniformly packed. The first layer on the sides can take a little coaxing to adhere to the wood and plastic, but once this layer is on, subsequent layers are much easier. Take special care to press the mix into the plastic design surface so that no glaring pockmarks appear in the finished planter.
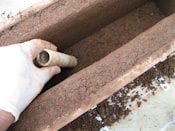
After you’ve finished forming the bottom and sides, don’t forget to carve drainage holes in the bottom. A small paring knife or hollow pipe both make ideal hole-borers. If the boring disturbs and loosens the surrounding hypertufa, gently press back into place. Two holes are sufficient for a 16-inch planter.
Let the hypertufa cure for 48 hours before demolding. In warm weather, cover with plastic film while curing and set in a cool, dry place such as a garage. To demold, unscrew the wooden frame and gently pull the sides away from the design surface. If you wish to soften the 90-degree edges, use coarse sandpaper or a metal file. Cure another two or three days before filling with soil and plants.
Optional: Planter Feet and Wooden Molding Core Planter Feet
Planter feet are easy to incorporate into the mold. Using a jigsaw, simply cut out two (or more if you want three or four feet) slots in the base of the mold however wide and long you want the feet to be. If the plywood is one inch thick, these two slots alone will make feet measuring one inch high. To double that height, simply screw strips of plywood along all four edges of the slots (on the outside of the mold) then cap with plywood.
Again, draft is as important here as it was with the edging strip! If the walls of the foot slot are straight up and down, the deeper the cavity the more difficult it will be to demold the planter. The hypertufa can also get damaged while shimmying the feet out of the mold. To build draft into the foot cavity squeeze caulk around all four walls. Smooth and sculpt the caulk to form a slope from the top of the cavity down to the bottom. (*see illustration). Don’t forget to brush on a coat of vegetable oil for easier release. You could get fancy with these feet and make a draft so acute that the finished feet resemble inverted triangles.
Wooden Molding Core
Want to cut down on the time it takes to hand- form the sidewalls? This too is easy. If you’re planning on making several planters, a wooden molding core helps make the work much easier plus creates very even, consistent sidewalls.
For the planter I built, the inner dimensions were 6”x 6”x 18” (though the plastic design strips stick out about a half inch on either side). For the molding core, I cut two “endcap” pieces of plywood that measured approximately 3 ½- 4” wide and 7-8” high. I then cut 4 or 5 strips of plywood for the length and breadth of the core that measured approximately 14 ½” long by 7-8” high. When centered inside the mold, there should be a gap of one to one and a half inches between the molding core and all four walls of the mold. If a wider gap is needed, simply remove one (or more) long pieces of plywood. If the gap is too wide, narrow by adding plywood.
Pack an inch of hypertufa into the bottom of the mold, followed by a layer coating the design surface. Now center the wooden slats in the middle of the mold and begin dropping hypertufa a little at a time into the mold, packing firmly in place as the layers are added. I used a scrap piece of plywood as a packing tool. Build up all four sides evenly to keep the inner wooden core in place. After the mold is full and well-packed, gently shim the two end pieces of plywood out. This will allow wiggle room for the lengths of plywood to be removed as well. Some hypertufa may become slightly dislodged; pack gently back into place.
In answer to the question “why not dispense with all these slats and build a wooden box as the inner frame?” the answer again is draft. Unless you design an angle to that box, it won’t come out after hypertufa gets packed in. I learned that lesson the hard way!
Enjoy your project and your beautiful planters!